Notifications allow users to automatically send email messages when an application is started, submitted, or expires. These notifications can be used to send an email to an applicant when they start or submit your application, when an application has gone unchanged for a certain number of days, or they can be used to send emails internally to staff members when applicants meeting certain criteria start or submit an application.
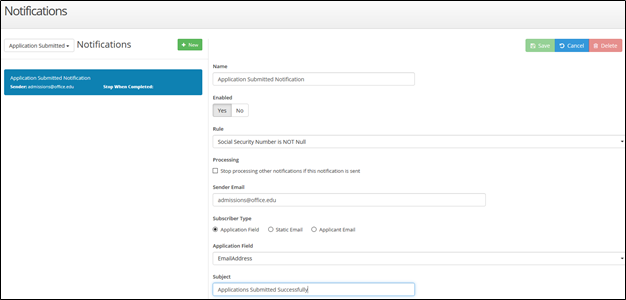
Creating a New Notification for Submitted Applications
Application | Notifications
- Choose the Correct Type of Notification - Select Application Submitted above the heading of ‘Notifications’
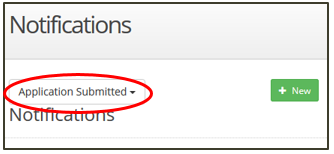
- Create a New Notification - Click the + New button to the right of the heading of ‘Notifications’.
- Name the Notification - Enter the Name for your new notification - This is an internal label; this is what you as the campus will see within CrossConnect.
- Select if the Notification Should be Enabled - Select whether or not you want to rule Enabled. Setting this to Yes will start sending notifications immediately after clicking save.
- Select a Rule (If Needed) - If you would like the rule to only be sent to students who fit into a certain category select the rule from the Rule drop-down menu that you would like the notification to validate upon (See examples below these instructions for further details on using rules). This dropdown list of rules includes all of the rules in your selected application. This included application dynamic rules and those you have created. You can type into the list to perform a smart search for the rule you want or scroll to locate your desired rule.
- After selecting a rule the Processing option will appear. Selecting this will stop other notifications from being sent, to the same student, if the selected rule is satisfied. Note: this field will only appear if a Rule is selected in the previous step

- Enter Sender Email - Enter the Sender Email that the recipient will see the email as coming from. NOTE: It is strongly suggested you use your generic campus admissions email address instead of a particular staff member’s email address.
- Choose the Subscriber Type - Select the Subscriber Type, the options are as follows:
- Application Field – Selecting this will allow the email to be sent to an email address entered into an email field on the application (e.g. Email entered by applicant, Applicant’s parent’s email address).
- Static Email – Selecting this will allow the email to be sent to the same email address for every instance of the rule being met (e.g. Send an email to an admissions counselor for every international application submitted).
- Applicant Email – Selecting this will send the email to the email address that the applicant provided when they created their account (the email address stored in their CFNC profile). This is useful for sending emails for started applications, where a student may not have entered another email address.
- Give the Notification a Subject - Type in the Subject of the email to be sent. NOTE: It is strongly suggested that you include your campus name or abbreviation in the subject line, this way students will know the email is from you without having to open it first.
- Fill in the Body of the Message - Fill out the Message of the email you would like to send. The editor will accept HTML coding if you would like to use HTML editing.
- Save the Notification - Click on the Save button (
 ) at the top of the page to save then notification. NOTE: When you click Save the notification will be LIVE and start sending to applicants that submit an application to your campus if Enabled is set to "Yes".
Creating a New Notification for Started Applications
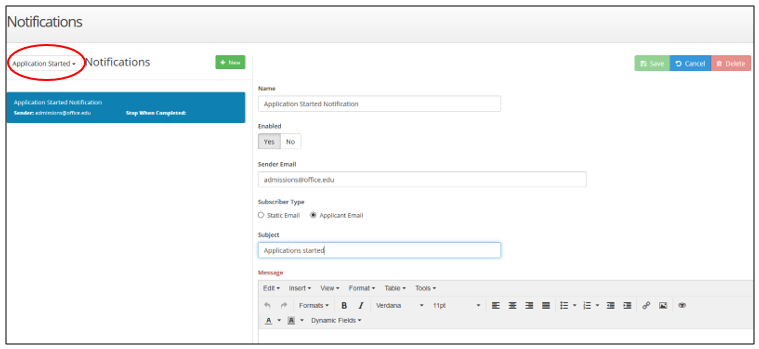
- Choose the Correct Type of Notification - Select Application Started above the heading of Notifications
- Create a New Notification - Click the + New button to the right of the heading of ‘Notifications’.
- Name the Notification - Enter the Name for your new notification - This is an internal label; this is what you as the campus will see within CrossConnect.
- Select if the Rule Should be Enabled - Select whether or not you want to rule Enabled. Setting this to Yes will start sending notifications immediately after clicking save.
- Enter Sender Email - Enter the Sender Email that students will see the email as coming from. NOTE: It is strongly suggested that you include your campus name or abbreviation in the subject line, this way students will know the email is from you without having to open it first.
- Choose the Subscriber Type - Select the Subscriber Type the options are as follows:
- Static Email – Selecting this will allow the email to be sent to the same email address for every instance of the rule being met (e.g. Send an email to an admissions counselor for every international application started).
- Applicant Email – Selecting this will send the email to the email address that the applicant provided when they created their account. This is useful for sending emails for started applications, where a student may not have entered another email address.
- Give the Notification a Subject - Type in the Subject of the email to be sent. NOTE: It is strongly suggested that you include your campus name or abbreviation in the subject line, this way students will know the email is from you without having to open it first.
- Fill in the Body of the Message - Fill out the Message of the email you would like to send. The editor will accept HTML coding if you would like to use HTML editing.
- Save the Notification - Click on the Save button ()at the top of the page to save then notification.
Creating a New Notification for Expired Applications
- Configure the Field to Enable this Notification - Configure the Days user application is considered still active in the Edit Applications | Settings section of CrossConnect (See the Help Center page on Application Settings for more information about this field)
- Go to the Notifications Page - Navigate to the Application | Notifications section of CrossConnect
- Choose the Correct Type of Notification - Select Application Expired above the heading of Notifications
- Create a New Notification - Click the + New button to the right of the heading of ‘Notifications’.
- Name the Notification - Enter the Name for your new notification - This is an internal label; this is what you as the campus will see within CrossConnect.
- Select if the Notification Should be Enabled - Select whether or not you want to rule Enabled. Setting this to Yes will start sending notifications immediately after clicking save.
- Enter Sender Email - Enter the Sender Email that students will see the email as coming from. NOTE: It is strongly suggested that you include your campus name or abbreviation in the subject line, this way students will know the email is from you without having to open it first.
- Choose the Subscriber Type - Select the Subscriber Type the options are as follows:
- Static Email – Selecting this will allow the email to be sent to the same email address for every instance of the rule being met (e.g. Send an email to an admissions counselor for every international application started).
- Applicant Email – Selecting this will send the email to the email address that the applicant provided when they created their account. This is useful for sending emails for started applications, where a student may not have entered another email address.
- Give the Notification a Subject - Type in the Subject of the email to be sent. NOTE: It is strongly suggested that you include your campus name or abbreviation in the subject line, this way students will know the email is from you without having to open it first.
- Fill in the Body of the Message - Fill out the Message of the email you would like to send. The editor will accept HTML coding if you would like to use HTML editing.
- Save the Notification - Click on the Save button ()at the top of the page to save then notification.
Editing an Existing Notification
Application | Notifications
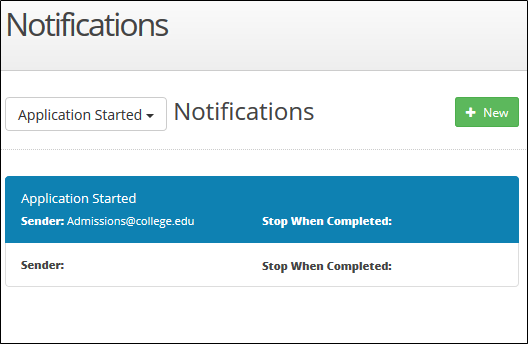
- Select the Notification - Click on the name of the notification that you want to edit.
- Make the Desired Edits - Once you are in the notification you want to change, you can edit the field you want to change.
- If you make a change by mistake you can click on the Cancel button in the top right of the screen to reverse a change
- Save the Changes - Click on the Save button (
 ) at the top of the page to save the changes made to the existing notification.
Deleting a Notification
Application | Notifications
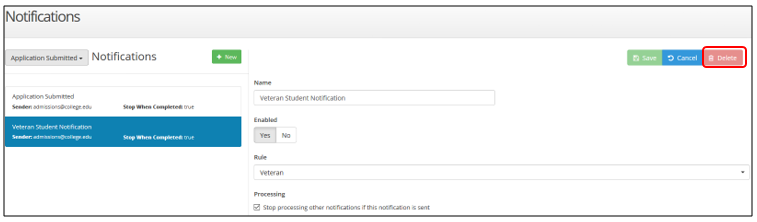
- Select the Notification - Select the Notification that you want to delete.
- Delete the Notification - Click the red Delete button at the top right of the screen.
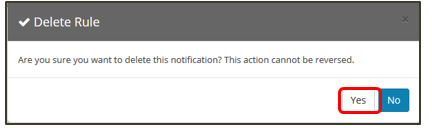
- Confirm the Decision - A pop-up saying “Are you sure you want to delete this notification? This action cannot be reversed.” will appear. Click Yes and the notification will be deleted.