Rules allow you to filter various data based on an end user’s response to a field on the application or a combination of fields on the application. Rules can be used in many places throughout CrossConnect, including but not limited to: Term fields, major lists, export projects, and reports. Rules are helpful when you want to look at a specific applicant group. Common uses for rules include separating application downloads by entrance status, running a report on applicants that do not provide a Social Security number, and downloading applicants that fall into a range of zip codes.
The Rules section in CrossConnect contains all the rules needed for your application (the dynamic displays), as well as any rules you create, with the exception of prospect rules (they are housed in the Recruitment section of CrossConnect; for more information see the CrossConnect: Recruitment Rules documentation). Because this section can contain hundreds of rules, all applied to different areas, a best practice is to put your campus initials (i.e. ASU, BRCC, UMO, etc.) at the start of any new rule you create. This way, you can be sure you are not editing a rule that is controlling dynamics on your application.
- You are not able to delete a rule that is being used by your application, but be careful because you can edit it; if you alter the logic of a rule used on your application, you will change how your application dynamics operate
- You can have a maximum of 500 rules per application
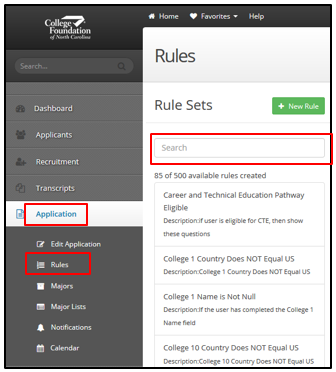
- To find a particular rule, type the Rule Name (or part of it) into the Search box at the top of the screen
Creating a Standard Rule
Application | Rules
Before you can implement a rule on an application term, report, or download, you first need to set up the rule. No matter how you intend to use the rule (to filter, to display or to validate) all rules are created the same way. There are three parts to standard rules:
- The Field
- The Operator
- The Value
- Add a New Rule - Click the + New Rule button (
 ) at the top of the screen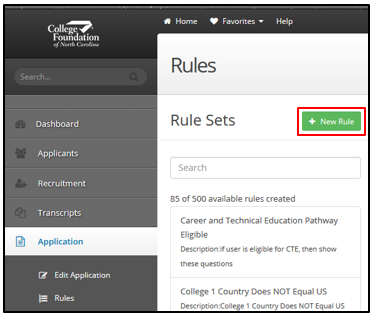
- Name the Rule - Give the rule a Name—This is an internal label that will populate in fields where you can add rules—e.g.: No SSN
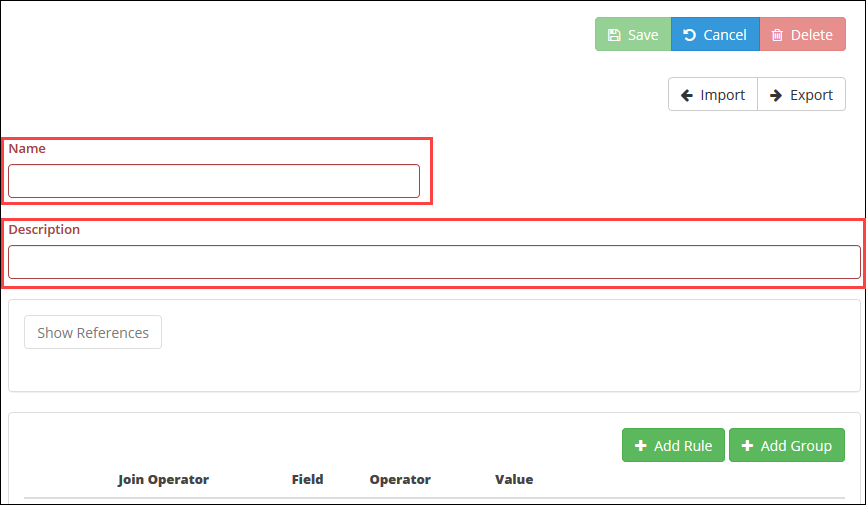
- Describe the Rule - Give the rule a Description—This is an internal descriptor that populates within the Rules section of CrossConnect; you should provide a thorough explanation, which will allow you to easily know what the rule is doing without having to click into it to see the setup—e.g.: Applicant did not include their SSN
- Add Logic to the Rule - Click the + Add Rule button (
 )
)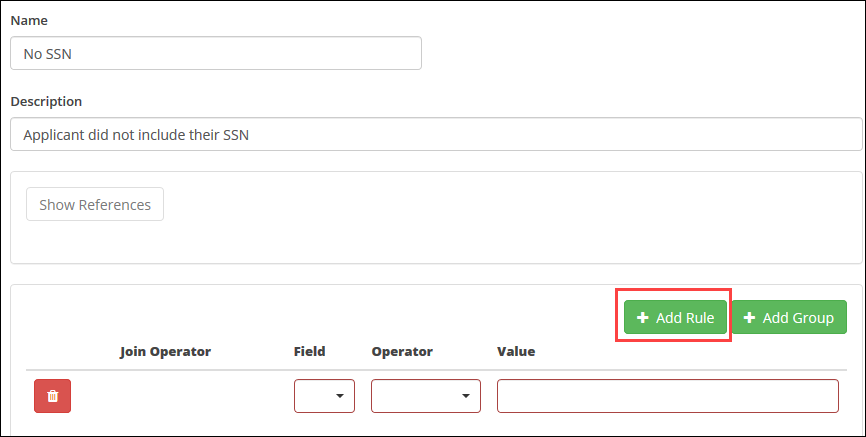
- Choose the Field Affected by the Rule - Under the “Field” heading, click the dropdown menu to populate the large download list of field keys (in the order they appear on your application) and select the one you want (you can type into the field to perform a smart search to find your field key faster)
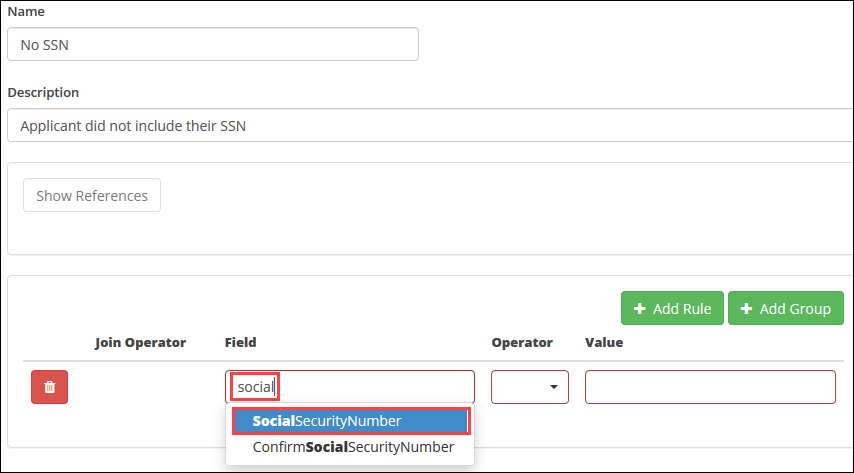
- See the Operator Options - Under the “Operator” heading, click the dropdown menu to reveal the list of possible logic operators for your selected key.
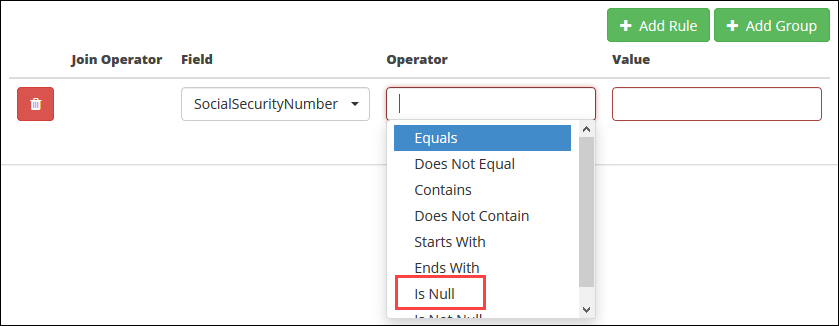
- Choose Your Operator - Click on the desired Operator to select it for your rule (See below for a complete list of the operators available and examples of how to use them)
- Enter a Value - Under the Value heading, enter the answer value for your field key that you want to filter/compare against
- Save the Rule - Click the Save button (
 ) at the top of the screen
Operator Options for Rules
Below is a full list, but the options shown when creating your rule will depend on the operators available for the field key you select:
- Less Than – The applicant’s answer to the selected “field” is less than what you enter into the “value” field (e.g.: TestACTTotal Less Than 15)
- Less than Equal To - The applicant’s answer to the selected “field” is less than or equal to what you enter into the “value” field (ex: HighSchoolGPA Less Than Equal To 2.5)
- Equals - The applicant’s answer to the selected “field” is equal to what you enter into the “value” field (e.g.: EntranceStatus Equals Freshman)
- Does not Equal – The applicant’s answer to the selected “field” does not equal what you enter into the “value” field (e.g.: PermanentAddressCountry Does Not Equal US)
- Greater Than Equal To – The applicant’s answer to the selected “field” is greater than or equal to what you enter into the “value” field (ex: HighSchoolGPA Greater Than Equal To 2.6)
- Greater Than – The applicant’s answer to the selected “field” is greater than what you enter into the “value” field (e.g.: TestACTTotal Greater Than 14)
- Contains – The applicants answer to the selected “field” contains one of the answers you enter into the “value” field (e.g.: PermanentAddressZipCode Contains 27516 Or PermanentAddressZipCode Contains 27510)
- Does Not Contain – The applicant’s answer to the selected field does not contain one of the answers you entered into the “value” field (ex: Major1 Does Not Contain ECO101 ENG201 OR Major1 Does Not Contain MAT859)
- Starts With – The applicant’s answer to the selected field starts with what you enter into the “value” field (e.g.: StudentLastName Starts With L)
- Ends With – The applicant’s answer to the selected field ends with what you enter into the “value” field (e.g.: Major1 Ends With 101)
- Is Null – The applicant’s answer to the selected field is blank (ex: SSN is Null)
- Is Not Null – The applicant’s answer to the selected field is not blank (ex: HowHeardAboutCollege is Not Null)
For more examples of common rules please see the Help Center articles on Common Rules Examples.