Export Projects is where you set which Export Settings you want to download and how they should be downloaded. On the Transcript Export Projects main screen, you can see any previously created Export Projects, edit these projects or create new ones.
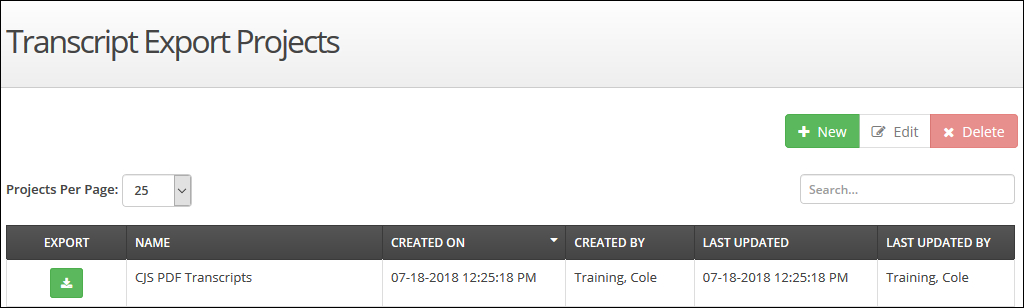
- The main Export Projects page shows all the transcript export projects created since the start of CrossConnect, that have not been deleted.
- Click the dropdown next to Projects Per Page to change the number of results you see on each page below. The default setting is 25 records.
- You can use the Search box to conduct a smart search to locate a specific Export Project
- The main screen provides information about each Export Project:
- Export: This is an action button that allows you to download exported data from a particular Export Project and allows you to apply filters.
- Name: This is a unique name assigned to the project when it’s created.
- Created On: This is the date and time the project was created.
- Created By: This is the name of the account holder who created the project.
- Last Updated: This is the date and time the project was last updated.
- Last Updated By: This is the name of the account holder who last updated the project.
- At the bottom of the screen, you can see the total number of projects currently available (over all pages)
- Click Next, Previous, or Specific Page number to navigate through the Export Projects
Creating the Export Project – All Transcripts
Creating an Export Project is the second part in the three-part process of downloading data.
- Create a New Project - Click the + New button (
 ) at the top of the screen
 - Name the Project - Enter the Name for the export project
- Choose the Field to Sort By - In the Sort By field you can choose a field from the transcripts to sort by (i.e. Last Name or DoB)
- If you choose a field for the Sort By field you will then be shown the Sort Direction field which allows you to choose the order you would like transcripts to be sorted
- Enter the File Name - Type the File Name for your new transcript Export project. This is the name of the zip file that gets downloaded
- Enter the Folder Name - Type the Folder Name for your project. This is the name of the folder within the zip file that holds your Export Setting data
- Enter the Maximum Transcripts to Download - Type the Maximum Transcripts to Download. This is the maximum number of records you want to export per download for every Export Setting you include in the Export Project.
- At times of high volume (College Application Week in November, final transcript release in June, etc.) you will want to keep this number low to ensure your download does not timeout.
- Additionally, if you are downloading PDF documents, you will want this number lower than if you are downloading XML documents, because the larger PDF files take longer to download.
- The largest number of records per setting you can download at one time is 200.
- Note: For PDF files, if you set the Maximum Applicants to Download to a number greater than 50 it will put your download into a queue and send an email to the email address connected to your CrossConnect account when it is ready and available for download. It will also be available via the Recent Export Files window on the Dashboard.
- Enter the New Transcript Cutoff Date - Type your New Transcript Cutoff Date. All submitted transcript data from this date forward in time will be considered “new” to this Export Project. Setting this date will prevent the Export Project from downloading all data ever received and limit it to just your new data.
- Select the Transcript Type - Select your Transcript Type. Here you can decide what kind of transcript (current, final or both) you want this export project to download. NOTE: If you select “current” or “final” you are not exporting all available transcripts, as applicants submit both to your campus.
- Select the Needed Options - The Options are optional.
- If you do not select any option, your data from your Export Settings will download as a single file per applicant per download setting (i.e. one Export Setting in the Export Project, each applicant has their own standalone file within the exported folder; two Export Settings in the Export project, each applicant has a standalone file for each of the two settings for a total of two files per applicant within the exported folder)
- Combine Export Setting Into One File:Each Export Setting within the Export Project downloads as one file with all the transcript data
- Combine All Results into One PDF File (All settings must be in PDF or attachments):If all the Export Settings within the Export Project are in the PDF format, this option will combine them all into one large PDF file within the export folder
- Only export Transcripts that have never been exported: This setting should be used with care and works best if you only have one export project downloading transcripts within the “Transcripts” section and one export project downloading transcripts and applications in a bundle within the “Applicants” section. By clicking this box, once a transcript is downloaded by any export project (various ones within “Transcript” or “Applicant”) it will not show up as new for this export project.
-
Open the Export Settings Module - Click the + Add Settings button (
 ) to select one or more Export Settings to include in your Export Project.
 - Choose the Export Settings to Add - In the Add Export Setting modal, click the Plus icon (
 ) next to the Export Setting name that you want to include in your Export Project You can select as many as you like; however, the more settings included the larger the file will be and large files can take a long time to download. If you include more than one, it’s suggested that you keep the Maximum Applications To Download number low.
 - Save the Export Settings - Once you make your selections, click the Save button (
 ) at the bottom of the Add Export Setting window.
 - Save the Export Project - Click the Save button (
 ) at the top of the screen to save your Export Project