The third and final step is to download your exported data. You will complete the steps below every time you want to download transcript data.
- Click the Export icon (
 ) next to the Export Project you want to use to download data.
- The total number of records available for download is listed at the top of the screen. This represents the number of “new” records since you last ran this download (or from the “New Transcript Cutoff Date” you set in your Export Project)
- If you do not put any filters in place, you will download all of the transcripts indicated at the top of the screen (up to the “Maximum Transcripts to Download” number you set in your Export Project).
- You can export a transcript or series of transcripts submitted by a specific applicant, by downloading by their Student ID (also called NC Student Number, formally NC WISE ID).
- You can download by entering dates to export all the transcripts completed (successfully delivered) to your campus during the date range you provide.
- With a filter selected (Note: you can only implement one filter) you will download all of the records that meet the filtered criteria (up to the “Maximum Transcripts to Download” number you set in your Export Project).
- You can clear any selected filters by clicking the Clear Filter
- Click the Export button (
 ).
). -
Once your download is successful, you will see the message “Export file successfully generated. [Number of records] exported.” The Download Export File button will also appear.
- Click the Download Export File button (
 ) to download your zip folder to a desired location on your computer.
-OR-
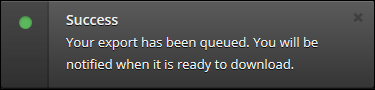
If you are trying to download a batch of PDFs with more than 50 applications in it you will see a message "Success Your export has been queued. You will be notified when it is ready to download" and you will receive an email when the file is ready for download.
Your export setting(s) are downloaded now and are contained within the zip folder. To open the zip folder, you will need to extract the files. You can do this by either double-clicking the zip folder (if you have a file extractor program set up as default on your computer) or right-click the zip folder and select Extract Files.
File Naming of Export Settings & Projects
File names and folder names are set in both Export Settings and Export Projects. These file and folder names populate depending on which Options are or are not selected in Export Projects:
- If you do not select any option in Export Project configuration, data from the Export Settings will download as a single file per applicant per download setting. The downloaded data will show in the following folders and files:
- Export Project File Name (zip file) | Export Project Folder Name (folder) | Export Setting File Name (files)
- Combine Export Setting Into One File: Each Export Setting within the Export Project downloads as one file with all the transcript data. The downloaded data appears in the following folders and files:
- Export Project File Name (zip file) | Export Setting Single File Name (file)
- Combine All Results into One PDF File (All settings must be in PDF or attachments):If all the Export Settings within the Export Project are in PDF format, this option will combine them all into one large PDF file:
- Export Project File Name (file)
- Only export transcripts that have never been exported: If this is checked, only items that have never been exported from any export project will be exported.
Editing and Managing Transcript Exports
- To edit an existing Export Setting, double-click the setting you wish to edit or click the setting and then the Edit (
 ) button
- Click the Save (
 ) button to save any edits you make
 - Click the Cancel (
 ) button to undo any edits you make
- Click the Save (
- IMPORTANT NOTE: If you change an Export Setting that is already added to an Export Project, you will need to edit and save the Export Project before your changes will be reflected in the download. Refer to Transcripts | Export Projects directions below.
- To delete an existing Export Setting, click the setting you wish to delete and then click the Delete (
 ) button
Transcripts | Export Projects
- To edit an existing Export Project, double-click the project you wish to edit or click the project and then the Edit (
 ) button
- Click the Save (
 ) button to save any edits you make
 - Click the Cancel (
 ) button to undo any edits you make
- Click the Save (
- To delete an existing Export Project, click the setting you wish to delete and then click the Delete (
 ) button
 - IMPORTANT NOTE: If you make a change to an Export Setting that is already added to an Export Project, you will need to edit the Export Project, remove the setting, add it back to the Export Project, and then save. This will ensure that your updated Export Setting is being used in your Export project:
- After making and saving changes to your Export Setting, navigate to Export Projects (Transcripts | Export Projects)
- Select the Export Project that contains the Export Setting you just made changes to
- Click the Edit (
 ) button
 - On the right side of the screen under Export Settings click the “X” (
 ) in the upper right corner of the Export Setting you edited to delete it from the Export Project.
 - Click the + Add Settings button (
 ) to open the Export Setting modal
 - In the Add Export Setting window, click the Plus icon (
 ) next to the Export Setting that you made edits to
 - Click the Save button (
 ) at the bottom of the window
 - Click the Save button (
 ) at the top of the screen to save your Export Project
Common Transcript Export Actions (Examples)
PDF Transcript Example
You want to download both current and final transcript data, in the PDF format, with all transcripts in one large file since 08/18/2016:
- Transcripts | Export Settings
- Click + New
- Type the Name of “PDF Transcripts” (this is the name you see in Export Projects to select your Export Setting to add)
- Type the File Name (name of the downloaded files when downloaded as separate files)
- Type the Single File Name (name of the downloaded file when downloaded as a setting combined file, since you will be downloading as a single file, this is the file name that will populate in your download)
- Select the radio button next to PDF
- Click the Save (
 ) button
 - Transcripts | Export Projects
- Click + New
- Type the Name of “PDF Transcripts” (this is the name you see when downloading)
- Type a File Name (name of the zip file all data is downloaded in from CrossConnect)
- Type a Folder Name (name of the folder if downloaded as individual files)
- Type the Maximum Applicants to Download to set the max number of records
- Set the New Application Transcript Cutoff Date of 08/18/2016
- Under Transcript Type, select the radio button next to Both to export current and final transcripts
- Under Options, click the checkbox next to Combine Setting into One File
- Click + Add Setting to open the Add Export Setting window
- Click the + icon (
 ) next to your Export Setting name of “PDF Transcripts”
 - Click Save at the bottom of the Add Export Setting window
- Click the Save (
 ) button at the top of the screen
 - Transcripts | Export Projects
- Click the Export (
 ) button next to the Export Project Name, “PDF Transcripts”
 - Click the Export button
- Click the Download Export File button to save and open the downloaded data
Individual PDF Transcripts Example
You want to download only final transcript data, in the PDF format, with all transcripts in separate files with their Student ID and the transcript Transaction ID in the file name, since 08/18/2016:
- Transcripts | Export Settings
- Click + New
- Type the Name of “PDF Transcripts” (this is the name you see in Export Projects to select your Export Setting to add)
- Type the File Name (name of the downloaded files when downloaded as separate files, since you will be downloading separate files, this is the file name that will populate in your download)
- After your File Name, type the field keys for Student ID, [[StudentId]], and Transaction ID, [[TransactionId]], to include them in your separate transcript file names
- Type the Single File Name (name of the downloaded file when downloaded as a setting combined file)
- Select the radio button next to PDF
- Click the Save (
 ) button
 - Transcripts | Export Projects
- Click + New
- Type the Name of “PDF Transcripts” (this is the name you see when downloading)
- Type a File Name (name of the zip file all data is downloaded in from CrossConnect)
- Type a Folder Name (name of the folder when downloaded as individual files)
- Type the Maximum Transcripts to Download to set the max number of records
- Set the New Transcript Cutoff Date of 08/18/2016
- Select the radio button next to Final to just export final transcripts
- Under Options, leave all checkboxes blank
- Click + Add Setting to open the Add Export Setting window
- Click the + icon (
 ) next to your Export Setting name of “PDF Transcripts”
 - Click Save at the bottom of the Add Export Setting window
- Click the Save (
 ) button at the top of the screen
 - Transcripts | Export Projects
- Click the Export (
 ) button next to the Export Project Name, “PDF Transcripts”
 - Click the Export button
- Click the Download Export File button to save the downloaded data