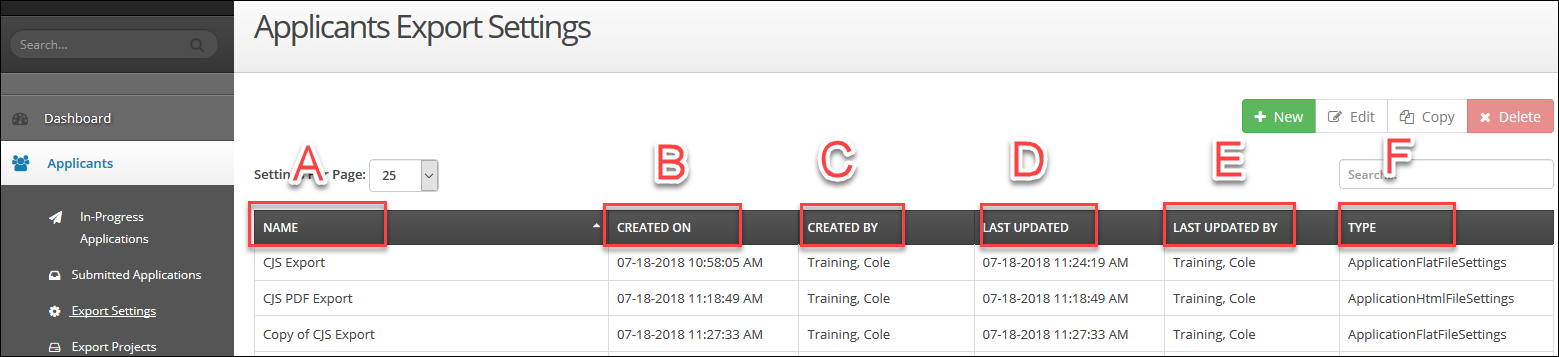
Export Settings is where you determine the format and types of applications you want to download. Here you can also see any previously created Export Settings, edit these settings or create new ones.
- The main Export Settings page shows all the application, task and attachment export settings, as well as all transcript bundle export settings created since the start of CrossConnect, that have not been deleted.
- Click the Settings Per Page dropdown list to change the number of results you see on each page. The default setting is 25 records
- You can use the Search box to conduct a smart search to locate a specific Export Setting name
- The main screen provides information about each Export Setting:
- A- Name: This is a unique name assigned to the setting when it’s created. This name populates to the Export Projects section, when you build your download
- B - Created On: This is the date and time the setting was created
- C - Created By: This name is the account holder who created the setting
- D - Last Updated: This is the date and time the setting was last updated
- E - Last Updated By: This name is the account holder who last updated the setting
- F - Type: This is a classification of the Export Type selected when creating the Export Setting
- At the bottom of the screen, you can see the total number of settings currently available to you (over all pages)
- Click the First, Previous, Next, Last, or Specific Page number to navigate through your Export Settings
Creating New Export Settings
Creating an Export Setting is the first step in the three-step process of downloading data.
- Create a New Export Setting - Click the + New button (
 ) at the top of the screen. The Edit – New Setting screen appears.
 - Select the Type of Export Setting - Select an application type from the Export Type dropdown
- Flat File: A file containing records that have no structured interrelationship. Includes common formats .csv and .xls
- PDF File: Printable format used to present documents in a manner independent of application software, hardware and operating systems
- JSON File: An open standard format that uses human-readable text to transmit data objects consisting of attribute–value pairs
- XML File: Format is used to create common information formats and share both the format and the data on the World Wide Web, intranets, and elsewhere using standard ASCII text
- Transcript: To download transcripts submitted with the CFNC.org application – see the “CrossConnect : Applicants Bundle” documentation for details
- Task Attachment: To download documents applicants upload to your various application tasks – see the “CrossConnect :Exporting Tasks and Attachments” documentation for details
- Enter a Name - Type the Name for your new application Export Setting. This is a unique name assigned to the setting when it’s created. This name will populate to the Export Projects section when you build your download and that populates to the main Export Settings screen
- Enter the File Name - Type the File Name for your new application Export Setting. This name populates within your Export Project downloaded zip folder. If you are downloading as separate files and not a combined file you can add a field key into the file name to personalize the downloaded file with information from the submitted application:
- You can add fields from the application to the File Name by entering the field key(s) with double brackets, as part of the name (ex: File Name: PDF Application [[StudentNameLast]] [[DOB]])
- If you do not know your field keys, you can either find them in the Application | Edit Application | Form section or, once you select fields in steps 7-9 below and click save, come back to this field, start your double bracket ([[) and the field keys for the fields selected and save on the “fields” tab will populate in a dropdown list
- If you want the date and time downloaded to populate to the file name, add the following to the field (case-sensitive): {MM-dd-yyyy hh-mm-ss}
- MM: two-digit month
- dd: two-digit day
- yyyy: four-digit year
- hh: two-digit hour
- mm: two-digit minute
- ss: two-digit second
Note: If you are going to download the same Export Setting multiple times a day, it’s a best practice to include the date and time stamp.
- Enter the Single File Name - Enter the Single File Name for your new application Export Setting. This name will populate within your Export Project downloaded zip folder, if you are downloading as a combined setting file. If you want the date and time downloaded to populate to the file name, add the following to the field (case-sensitive): {MM-dd-yyyy hh-mm-ss}
- MM: two-digit month
- dd: two-digit day
- yyyy: four-digit year
- hh: two-digit hour
- mm: two-digit minute
- ss: two-digit second
Note: If you are going to download the same Export Setting multiple times a day, it’s a best practice to include the date and time stamp.
- Enter a Delimiter for Flat Files - If you are creating a Flat File Export Setting, you will need to enter a field delimiter into the Separator field; all other formats skip to the next step. Enter your flat field delimiter directly into the Separator For a comma delimited export, type a comma (,) into the Separator field. For a pipe delimited export, type a pipe (|) into the Separator field. For a tab delimited export, leave the Separator field blank and make sure to select the Use Tab Separator option (covered in the next step)
- Continue to Adding Fields - Please see the Help Center page on Export Settings Fields for information on the next steps
On the Edit screen, there are various options available depending on your export type. Only the PDF File and Flat File export types have options (JASON and XML have no options):
|
Export Type |
Option Item |
Option Description |
|
PDF File |
Field Labels and Values Render On a Single Line |
Populates the field label and value on the same line in your PDF layout (this option will save space). |
|
PDF File |
Render only the Field Values |
Populates only the field values to your PDF layout and does not include the field labels. If using a custom layout with custom field names, check this box. |
|
Flat File |
Use Tab Separator |
Creates a tab delimited document. This will export as an .xls format document. |
|
Flat File |
Wrap Values in Quotes |
Allows field values containing your export separator to properly populate to your export file. Especially useful for comma and tab separator exports. |
|
Flat File |
Include Header Row |
Adds headers to the top of every export. The headers follow your field titles. Field titles can be edited in the “Edit Export Field” window, covered in the next section. |
|
Flat File |
Note: If you select BOTH “Wrap Values in Quotes” and “Include Header Row” your headings will also be wrapped in quotes. |
|