The calendar within CrossConnect allows campuses to maintain a list of events and dates that will be visible to applicants. When creating events you can categorize the event into one of the categories provided, so that students can see only the events for categories in which they are interested.
Creating Events
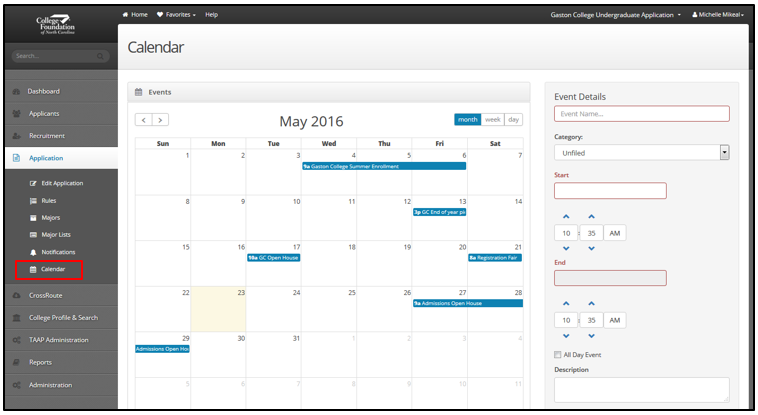
When creating or editing an events there are eight different categories under which you can classify your events. These categories are: Unfiled, Admission, Enrollment, Registration, Financial Aid, Private, Sports, and Chat. Event categorization is important for applicant and prospective students because within their CFNC profile they can choose to see only events that fall into a specific category.
When looking at the calendar within CrossConnect you can use Month, Week, or Day view. This is helpful if you have certain days with many events occurring. The default view is by month, but if you have several events occurring on a single day the default month view will be full and using week or day will allow you to clearly see all of the events that are scheduled.
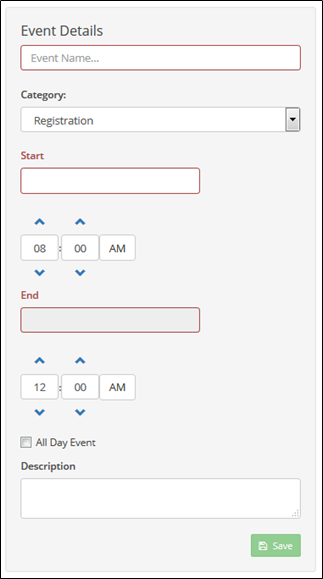
The information you can include about your events is as follows:
- Event Name - this is what student users of CFNC will see displayed for your event on their calendar
- Event Category – This will allow CFNC users to filter their events based on the category selected. The only exception to this is the “Private” category, which means the event will only display for campus users within CrossConnect and students on CFNC will not see the evet unless the category is changed
- Start Date – the day on which the event starts
- State Time – the time of day that the event will start
- End Date – the day on which the event ends
- End Time – the time on which the event ends
- All Day Event – If the event lasts for an entire day, or all day for multiple days this can be selected so that the event starts at the beginning of the start date and the end of the end date
- Description – This allows you to enter a description of the event so someone looking at it will know more about the event
Managing existing events
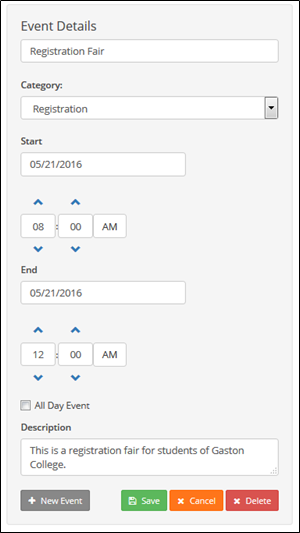
When first navigating to the calendar the Event Details panel on the right hand of the screen will be empty and you can start to create a new event. In order to look at the details of an existing event you will need to navigate to the month, week, or day (depending on your current view of the calendar) that the event occurs upon. After navigating to that date range you can click on the existing event and details of that event will populate to the Event Details panel. Within the Event Details panel you are also able to delete an existing event if you no longer want it to populate to CFNC user accounts.
Create a new event for an admissions open house
You want to create a new event on your calendar for open house event for your admissions office
- Navigate to Application | Calendar
- Under Event Details enter the Event Name
- Select the Category of “Admission” in the drop down menu
- Click into the Start field and select the date on which your event is occurring, you can also type the date into the field in MM/DD/YYYY format if you prefer
- Below the Start field enter the time your event is starting
- Click into the End field and select the date on which your event is occurring, you can also type the date into the field in MM/DD/YYYY format if you prefer
- Below the End field enter the time your event will end
- If you are having an event that lasts all day you can select the All Day Event check box
- Enter a short Description of the event for interested students and applicants to see
- Click the Save button (
 )
)
Change the details of an existing event
You want to change the category and date of an existing event
- Navigate to Application | Calendar
- Within the calendar navigate to the date the existing event is schedule for
- Click on the name of the event within the calendar
- In the Category dropdown select the new category you would like your event to be listed as
- In the Start field enter the new date of your event
- If the time has changed as well you can also change the time
- In the End field enter the new date your event will be ending
- If the time has changed as well you can also change the time
- Click the Save button ()