Terms are the enrollment periods that applicants can choose between when completing applications for admission to your institution (ex: Spring 2016, Summer 2017, Fall 2018). You must have a term open for end users to access your online application. Each unique end user account can only submit one application per term. You may have different terms for different applications.
Note: If you plan to have majors (programs of interest, areas of study, etc.) on your application, you need to set up Majors and Major Lists before setting up your term(s).—See “CrossConnect: Majors and Major Lists” documentation.
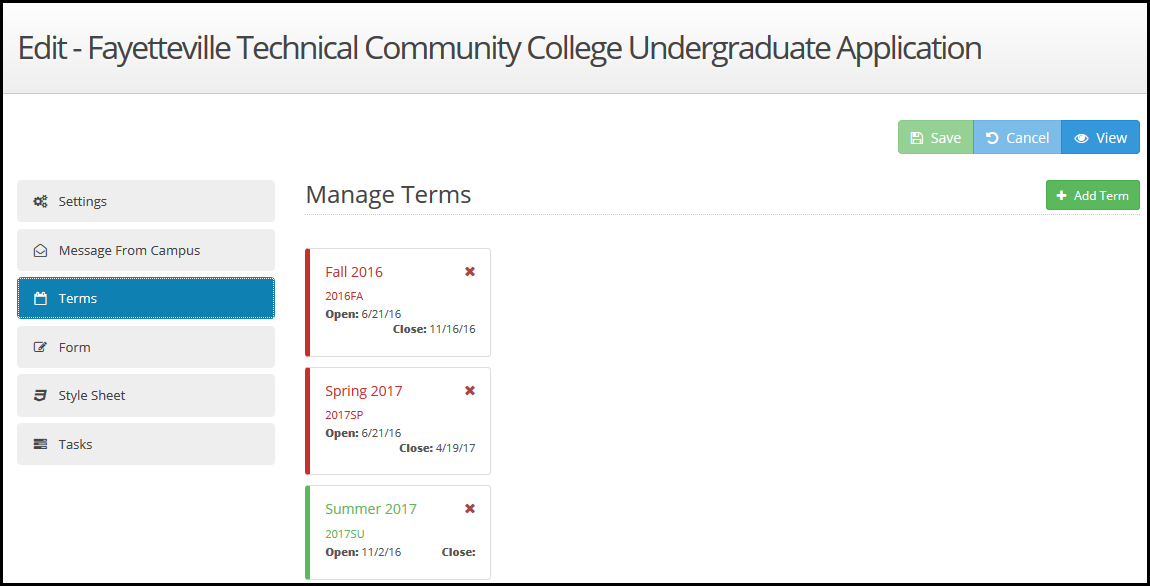
- Terms in red are currently closed; terms in green are currently open
- The large top title on the term is the term Name (this is what the end user sees on your application)
- The smaller second line of text/numbers is the term Code (the backend code that populates for you, the campus)
- The date the term is/was set to open is listed, as is the date the term is/was set to close
- Terms appear on the screen in the order they were created, with oldest terms at the top
- Terms are specific to the application, not the organization (i.e. if you have more than one application, you will need to set the terms for each application)
- Since terms do not show who last updated them and when, it’s suggested that campuses limit account permissions to this area
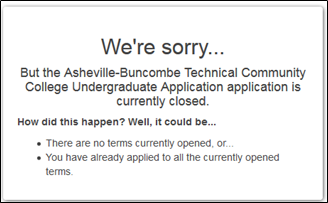
Note: Applicants will only be able to view your application if you have an open term. If you do not have an open term, or the student has already applied to all of your open terms, the applicant will see the following message (it will have your campus-specific application name; “Asheville-Buncombe Technical Community College Undergraduate Application” is just an example):
Creating Terms
Application | Edit Application | Terms
- Add Term - Click the + Add Term (
 ) button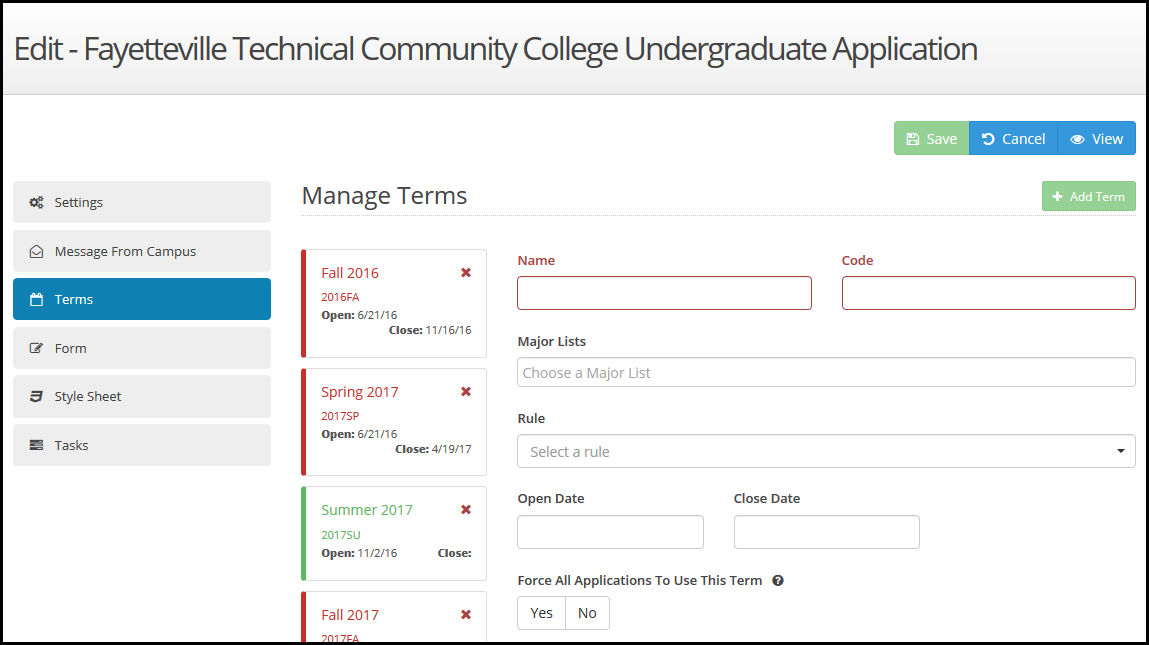
- Name the Term -Enter the Name for your new term—This is an external label; this is what the applicant sees on the application. This is a required field. There are no character limits on the length of the term name and HTML friendly special characters are allowed
- Add Term Code - Enter the Code for your new term—This is an internal label; this is what populates to your downloaded files when you download the application data. This is a required field. There are no character limits on the length of the term code and HTML friendly special characters are allowed.
Note: Since the system looks at both the term Name and Code, you may use the same code for different names, if you wish—e.g.: term name of “Fall 2015 - Freshman” and code of “2015FA” as well as a term name of “Fall 2015 - Transfer” and the same code of “2015FA”
- Attach Major List(s) - Select your Major List(s) that you want available for this term. Any applicant applying for this term will only be able to see the majors that are a part of the Major Lists you connect with this term.
- For example, if you have three Major Lists configured (one for freshman applicants, one for transfer applicants, and one for readmission applicants) in order for all of the majors to appear you would need to select all three in the Major List field. If you only selected your freshman applicants major list, transfer and readmission applicants would not see any majors.
- Based on the rule(s) you have in place on your Major Lists, if an applicant would be able to see more than one list, any duplicates created by combining the lists will be removed (e.g. you have a rule set up in your Major List that shows one list to freshman entrance statuses and readmits and you also have another Major List that shows majors for transfers and readmits. If an end user identifies as a “readmit” student, they would be able to see both of your Major Lists. Any majors that appear on both lists, will only show once to the readmit applicant—the system removes any duplicates when combining Major List views).
- For more information about Major Lists please visit the Major Lists section of our Help Center
- Add a Rule - If desired, select a Rule to limit those who can apply to your term (Note: adding a rule prevents everyone from applying to your term and limits it to those that meet your selected rule). The dropdown list you can see when you click ‘select a rule’ is a list of all the rules in your Application | Rules section. This step is optional (for more information about rules, please see the Application Rules section of our Help Center)
- Set Open Date - Set a date for the term to open, by clicking in the Open Date You can either enter the date in the mm/dd/yyyy format or you can select the date on the calendar. Note: your term will open as soon as it becomes this day, at 12:00am. You are not required to set an open date, but if you don’t the term will be open as soon as you click save.
- Set Close Date - Set a date for the term to close, by clicking in the Close Date You can either enter the date in the mm/dd/yyyy format or you can select the date on the calendar. Note: your term will close as soon as it becomes this day, at 12:00am. You are not required to set a close date, but if you don’t the term will not close until you delete the term.
- Choose If You Want Multiple Terms - If you want your term to be the only term applicants can select (only recommended for the high school applications that do not have semester enrollment), select Yes to the Force All Applicants To Use This Term Note: selecting “yes” means that no matter if you have additional terms created and open, applicants can only see and select this default term.
- Save Term - Click the Save button (
 ) to save your new term
Managing Terms
Application | Edit Application | Terms
To delete a term:
- Click the X (
 ) in the upper right corner of the term
 - Select Yes when asked if you are sure you want to delete the term
To edit a term:
- Click on the term you want to edit
- This will open the term information. Make your edits
- Click the Save button ()
Common Term Actions (Examples)
Application | Edit Application | Terms
New Term Example
You want to create a term called Fall 2017, with the internal campus value of FA2017, open to all applicants, that will open on September 1, 2016 and close on May 1, 2017. This will NOT be a term all applicants are required to select (meaning, they can select this term or another term you have or will have open):
- Click the + Add Term button
- Type “Fall 2017” in the Name field (this is what applicants will see on the application)
- Type “FA2017” in the Code field (this is what will populate on the backend for you, the campus)
- Click on the Major Lists field and select the major list(s) you want to be available for this term
- Leave the Rule field blank (since you want this term open for all applicants)
- Click on the Open Date field and enter the date 09/01/2016
- Click on the Close Date field and enter the date 05/01/2017
- Click No under Force All Applicants To Use This Term
- Click the Save ()
Edit Term Example
You want to edit a term called Fall 2019 (code FA2019) to add some text to what the applicant sees for this term on the application (“ - Classes start August 12, 2019”) and to change the close date to May 15, 2019:
- Click on the Fall 2019 term on the Manage Terms screen
- Click on the Name field
- After the current text of “Fall 2019” add the following text, “ - Classes start August 12, 2019”. When an end user sees this term on an application, it will read “Fall 2019 – Classes start August 12, 2019”
- Click the Close Date field, delete the current date of 05/01/2019 and add the new date of 05/15/2019 in its place
- Click the Save button ()
Delete Term Example
You want to delete the term called Fall 2017 (code FA2017):
- Click on the Fall 2017 term on the Manage Terms screen
- Click the X () in the upper right corner of the term
- Click Yes when asked if you are sure you want to delete the term